Do you have a personal glossary of terminology you'd like to use in Fluency Now? Or maybe you'd like to add a single term on a one-by-one basis. This how-to guide is designed to assist you in either scenario.
Adding a Glossary File
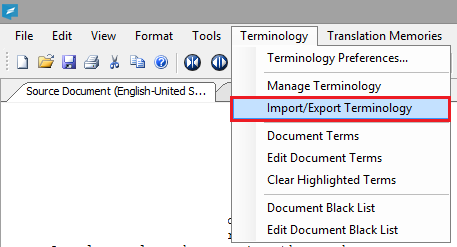
Step 1: Open the Terminology menu and click on Import/Export Terminology.
Step 2: Click the Browse button to locate your glossary file.

Supported glossary formats include TBX, TXT, TAB, CSV, XML, SDLTB, and DOC/X.
When working with CSV or Tab Delimited (TXT) format, please arrange the columns as listed below.

Next, locate and select your glossary file, then click Open.

Once you see the Ready to Import notification, click OK, then click the Import button.

Upon import, you’ll see an Import Results window. Once successfully imported, you will be able to access and use your terms in the next document you work on.

Adding Individual Terms
Step 1: Highlight the word or short phrase you’d like to add to your terminology database, then click on the + symbol in the upper toolbar.
You can also right-click on the highlighted text and use the Add Term(s) to Database option.

Step 2: The ‘Add Term’ window will appear. You can modify the source and target versions of your term here, which is how they will appear in your Terminology window during translation.
Additional fields are optional, but allow you to further customize the term, with additional translations, client and domain information, etc.
Note the check-boxes at the bottom allow you to add the term to your personal terminology database, or to your Tracked Terms list (or both).
Once you’ve modified all desired fields, click the Add button.

Once you’ve added your terms, they will appear in the Terminology window when applicable. Personal terms are highlighted and Fluency terms are in white.

For additional assistance or information, please contact us at support@westernstandard.com .
